Table of Contents
Location costmaps
This tutorial demonstrates the location costmap library of CRAM, including its API, examples of existing costmaps and how to write your own new costmaps.
Introduction
If you recall, the resolution of a location designator is divided into two steps - a generation step and a verification step. The generators yield sequences of solution candidates in the form of lazy lists and verification functions accept or reject solutions. The constraints specified with designators normally restrict the solution space but still leave many potentially valid solutions. The process of resolving location designator properties and generating poses in space is split up into three parts in order to deal with the computational complexity of the six-dimensional space of poses and to make a sampling-based approach feasible. Informally, the generation of a pose can be resolved as follows:
- Generate a two-dimensional grid based on location designator constraints with values greater than zero for all potentially valid solutions. It is a map representing the solution density of a specific cell where greater values represent more solutions for a specific constraint.
- Use the grid as a probability density function to generate random samples.
- Use Heuristics to resolve the orientation and Z coordinate of the generated pose.
- Use the physics-based reasoning system to prove that the solution is valid.
As can be seen, the first three steps generate a solution candidate while the last step verifies it.
Costmaps are density maps of two-dimensional matrices of positive real numbers which allow for representing spacial constraints such as on or in but also represent locations from which objects can be reached to a certain extent. Additionally, they can be merged easily and they can be converted to valid probability density functions to be used for sampling. Each entry corresponds to a grid cell in the x-y-plane of the robot's environment. Values of zero indicate that the corresponding grid cell cannot be a solution for the designator to be resolved and values greater than zero indicate potential solution candidates.
For further reading, refer to section 4 of Lorenz Mösenlechner Ph.D. Thesis.
Setup
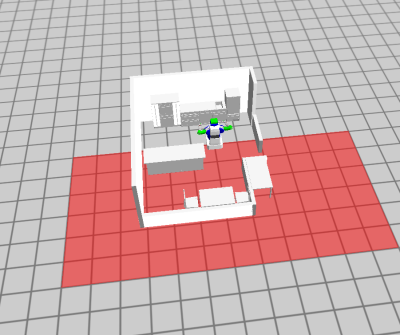
- set up the environment in our terminal by calling the launch file:
roslaunch cram_bullet_world_tutorial world.launch
- load cram_bullet_world_tutorial in the REPL
- start a node in REPL with (roslisp-utilities:startup-ros)
- define costmap parameters:
(prolog:def-fact-group costmap-metadata ()
  (prolog:<- (:costmap-size 10 10)) ; in meters
  (prolog:<- (:costmap-origin -5 -5))
  (prolog:<- (:costmap-resolution 0.05))
  (prolog:<- (:costmap-padding 0.01))) ; padding to occupancy map obstacles
Creating and resolving location designators
- create a designator and resolve it:
(defparameter *designator* (desig:a location (visible-for pr2)))
(desig:reference *designator*)
Visualization of costmaps
- start rviz and add Map, Marker and MarkerArray
- as “Topic” for the Map select “/map”
- as “Marker Topic” select “/cram_location_marker” and “/cram_location_costmap” respectively.
- to see which costmap was used, call this:
(defparameter *costmap*
     (cut:var-value
          '?cm
          (car (prolog:prolog `(and (location-costmap:desig-costmap ,*designator* ?cm))))))
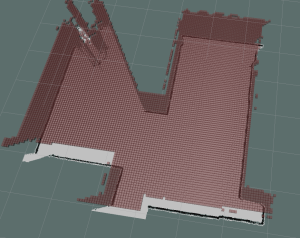
- to visualize the costmap and see generated values:
(location-costmap:get-cost-map *costmap*)
–> CRAM costmaps calculate values from 0 to 1: 0 – bad sample, 1 – perfect sample
- In rviz you should see something like this:
- to remove visualization markers call
(location-costmap::remove-markers-up-to-index 10000)
Creating your own cost function
To define your own location relations you need to do three things:
- Define a cost function which resolves the relation you want
- Register a name for your cost function
- Define rules for generating a costmap using your cost function associate it with your registered name
Let's define a behind relation.
- create a cost function which returns for each {x, y} in location costmap grid a value between [0, 1]
(defun make-behind-cost-function (ref-x ref-y)
           "`ref-x' and `ref-y' are the coordinates of the reference point according to which the behind-relation is resolved."
           (let* ((supp-tf (cl-transforms:make-transform
                               (cl-transforms:make-3d-vector ref-x ref-y 0)
                               (cl-transforms:make-identity-rotation)))
                  (world->supp-tf (cl-transforms:transform-inv supp-tf)))
             (lambda (x y)
               (let* ((point (cl-transforms:transform-point world->supp-tf
                                                            (cl-transforms:make-3d-vector x y 0)))
                      (vector-length (cl-transforms:dot-product point point)))
                 (if (and (< (cl-transforms:x point) 0.0d0)
                          (> (abs (/ (cl-transforms:x point) vector-length)) 0))
                     1
                     0)))))
To summerize, we can see that the individual value in the costmap generator is set to 1 if it is behind the reference point and else it's set to 0.
- define order for your costmap function and give it a name:
(defmethod location-costmap:costmap-generator-name->score ((name (eql 'behind-cost-function))) 10)
The name of our costmap function would be behind-cost-function and it's order is 10
- define the prolog rule for generating costmaps:
(prolog:def-fact-group tutorial-rules (location-costmap:desig-costmap)
           (prolog:<- (location-costmap:desig-costmap ?designator ?costmap)
             (desig:desig-prop ?designator (:behind ?pose))
             (prolog:lisp-fun cl-transforms:origin ?pose ?pose-origin)
             (prolog:lisp-fun cl-transforms:x ?pose-origin ?ref-x)
             (prolog:lisp-fun cl-transforms:y ?pose-origin ?ref-y)
             (location-costmap:costmap ?costmap)
             (location-costmap:costmap-add-function
              behind-cost-function
              (make-behind-cost-function ?ref-x ?ref-y)
              ?costmap)))
In short, the reference x and y is obtained from the pose we have to calculate the behind relation to. These are then passed on to our previously defined costmap generator, which in turn will generate the costmap we require.
- resolve a designator with your new awesome costmap:
(defparameter *behind-designator*
           (desig:make-designator :location `((:behind ,(cl-transforms:make-identity-pose)))))
(desig:reference *behind-designator*)
- if you were to visualize the costmap like above you would get this:
(location-costmap:get-cost-map
 (cut:var-value
  '?cm
  (car (prolog:prolog `(and (location-costmap:desig-costmap ,*behind-designator* ?cm))))))
The code can also be used to visualize the other costmap functions in this tutorial.
Using other (pre-defined) cost-functions
In the location-costmap package there are other cost function already available for generating costmaps. Here are two examples:
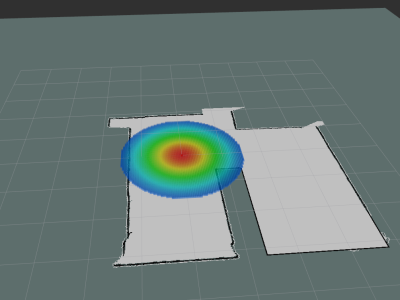
- using gaussian costmap function:
(prolog:def-fact-group tutorial-rules (location-costmap:desig-costmap)
  (prolog:<- (location-costmap:desig-costmap ?designator ?costmap)
    (desig:desig-prop ?designator (:behind ?pose))
    (prolog:lisp-fun cl-transforms:origin ?pose ?pose-origin)
    (location-costmap:costmap ?costmap)
    (location-costmap:costmap-add-function
     behind-cost-function
     (location-costmap:make-gauss-cost-function ?pose-origin #2A((0.5 0) (0 0.5)))
     ?costmap)))
The visualized costmap looks like this:
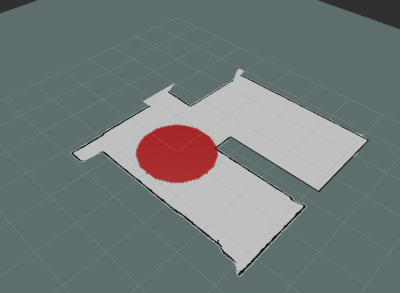
- using range costmap function:
(prolog:def-fact-group tutorial-rules (location-costmap:desig-costmap)
  (prolog:<- (location-costmap:desig-costmap ?designator ?costmap)
    (desig:desig-prop ?designator (:behind ?pose))
    (location-costmap:costmap ?costmap)
    (location-costmap:costmap-add-function
     behind-cost-function
     (location-costmap:make-range-cost-function ?pose 1.0)
     ?costmap)))
The visualized costmap looks like this:
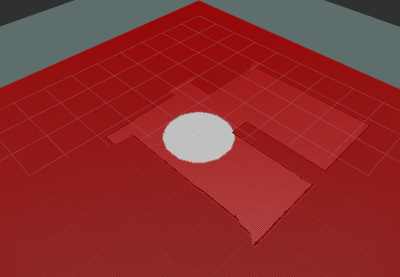
- using range costmap function inverted:
(prolog:def-fact-group tutorial-rules (location-costmap:desig-costmap)
  (prolog:<- (location-costmap:desig-costmap ?designator ?costmap)
    (desig:desig-prop ?designator (:behind ?pose))
    (location-costmap:costmap ?costmap)
    (location-costmap:costmap-add-function
     behind-cost-function
     (location-costmap:make-range-cost-function ?pose 1.0 :invert t)
     ?costmap)))
The visualized costmap looks like this:
Using your own Z coordinate function
So far the costmaps that you have generated/used is set on the 2D XY plane and the Z is taken to be 0 by default. Height generators can also be defined along with the cost functions which determines the z coordinate of the sampled pose from the costmap. There are a couple of ways you can define a height generator for your costmap:
Consistent Height
With this, you can fix the z coordinate to one constant value for all the poses generated. CRAM provides you the method to do this easily. Let's take the example we used above and modify it a little bit.
(prolog:def-fact-group tutorial-rules (location-costmap:desig-costmap)
  (prolog:<- (location-costmap:desig-costmap ?designator ?costmap)
    (desig:desig-prop ?designator (:behind ?pose))
    (location-costmap:costmap ?costmap)
    (location-costmap:costmap-add-function
     behind-cost-function
     (location-costmap:make-range-cost-function ?pose 1.0)
     ?costmap)
    (costmap:costmap-add-cached-height-generator
     (costmap:make-constant-height-function 1.0)
     ?costmap)))
Notice that the only thing that we added is this particular line:
(costmap:costmap-add-height-generator
  (costmap:make-constant-height-function 1.0)
  ?costmap)
The end result is that all the poses generated will now have a z-coordinate of 1.0 units.
The visualized costmap using the bullet world looks like this:
Configuring height according to conditions
In a real scenario, not all the z coordinate would be constant, due to terrain differences, obstacles, etc. CRAM allows you to model this similar to how you created your own custom costmap. For this, let's define our own height-generator, as shown below:
(defun positive-y-height-generator ()
  (lambda (x y)
    (if (> y 0.0)
        '(1.0) '(0.0))))
As before, the lambda function will get both x and y as inputs but this time we are expected to return a list of possible heights and a random value out of the satisfied condition list is taken. In this example, if y is greater than 0, then the height generator returns 1, else 0 otherwise. To use it in our designator, we redefine our fact group again:
(prolog:def-fact-group tutorial-rules (location-costmap:desig-costmap)
  (prolog:<- (location-costmap:desig-costmap ?designator ?costmap)
    (desig:desig-prop ?designator (:behind ?pose))
    (location-costmap:costmap ?costmap)
    (location-costmap:costmap-add-function
     behind-cost-function
     (location-costmap:make-range-cost-function ?pose 1.0)
     ?costmap)
    (costmap:costmap-add-height-generator
     (positive-y-height-generator)
     ?costmap)))
Note that we only replaced the constant height generator with our own function.
Using your own Orientation Generator
As mentioned in the introduction, the resolution of the designator can also involve resolving an orientation in addition to resolving height and the pose from the costmap. In this section, we will see how we can employ orientation generators to give various poses when resolving a location costmap. This works similar to how we defined and used the height generator, with some minor changes. By default, if no custom orientation generators are used, the system will use it's own identity orientation generator where all the poses will have identity rotation aligned to the reference axis. Let's jump into defining and using our own version of an orientation generator:
(defun make-4-orientations-generator ()
  (lambda (x y previous-orientations)
    (declare (ignore x y previous-orientations))
    (mapcar
     (lambda (angle)
       (cl-transforms:axis-angle->quaternion
        (cl-transforms:make-3d-vector 0 0 1)
        angle))
     `(0.0 ,(/ pi 2) ,pi ,(- (/ pi 2))))))
Note: Here we will receive a parameter called previous-orientations in addition to x and y, and this parameter can be used to incrementally modify the orientation that are generated. In this particular example, we are not using these parameters, but just creating 4 possible orientations (0, pi/2, pi and -pi/2) regardless of the previous orientation or the current position. The user can make use of these parameters according to their own use-case. And finally adding it to the fact-group
(prolog:def-fact-group tutorial-rules (location-costmap:desig-costmap)
  (prolog:<- (location-costmap:desig-costmap ?designator ?costmap)
    (desig:desig-prop ?designator (:behind ?pose))
    (location-costmap:costmap ?costmap)
    (location-costmap:costmap-add-function
     behind-cost-function
     (location-costmap:make-range-cost-function ?pose 1.0)
     ?costmap)
    (costmap:costmap-add-height-generator
     (positive-y-height-generator)
     ?costmap)
    (costmap:costmap-add-orientation-generator
     (make-4-orientations-generator)
     ?costmap)))
The visualized costmap using the bullet world looks like this:
